How to Quickly Grow Your List with AWeber
In this article, I will show you how to quickly get started growing your list and client base using AWeber, whether you have a website or not – and if you don’t have much content.
One key element to develop in your business is your “list.” This is your list of potential clients and customers. It’s a list of people who have indicated interest in you and what you can offer.

Why keep a list?
Great question. Here are three solid reasons:
Reason 1 – To build your image as an expert.
As you grow your list and stay in touch with them, your image as an expert will grow. People like to hire experts and pay more for them.
Reason 2 – To build trust as people aren’t ready right to buy now.
Many people you meet won’t be ideal for coaching at the time you meet them but may be in the future. Staying in touch by email can help you build trust with them so when the time comes in the future, they are “pre-sold” on working with you.
Reason 3 – To get more referrals.
As people on your list get to know you, they will mention your name to others. And it’s very easy for them to forward your name – just forward your email to their friends.
And again, you don’t need a website to do this.
You simply add names manually to your email list and, over time, send them helpful articles or resources to support them in their goals.
You don’t need to have much material prepared either.
The great thing about growing your list this way is that you can begin by sending a new article, tip, or other valuable resources as you go.
You do not need any prepared material to get started. For example, each week, you can write a new article and email it to your list.
Alternatively, you could send valuable resources, educational videos, tip sheets, hands-on exercises, informative assessments, etc.
In time, you’ll amass articles that can be compiled into an e-book or e-course and which can then in turn, be used as a free giveaway, a proprietary tool for clients who work with you, or even a product to be sold.
In essence, you are building information assets for use in your business.
Here’s how to get it going NOW.
Step 1. Setup an account at AWeber
Go to AWeber and set up an account.
This should take about 10-15 minutes to get the basics in place – your email address, creating a list name and description and adding your physical mailing address.
Step 2. Script out your verbal invitation to your email list
When you go to networking events, you will need to give people a compelling reason to get onto your email list.
You don’t want to just say, “Can I have your email address?” because it’s awkward.
In people’s minds, such an invitation sounds more like “Can I send you more promotional emails to your already overfull inbox that you probably won’t want?” – to which you’ll probably say yes to be nice although you’d wish you’d said no, and will probably unsubscribe or filter them away.
Instead of asking for email addresses, invite people to receive value.
Instead, try an invitation like this …
“It was great talking to you, John. I regularly send articles and resources about every (or 2 weeks, or month), to help people attain their desires, motivate them to action, and get past success blockers. I’d love to stay in touch with you by email. There’s no fee for being on my list, and if you would like this kind of support, just give me your email address, and I can add you when I get home. Oh, if you find the information unhelpful, you can easily remove yourself anytime with one click.”
Then just smile and wait. They will probably happily say, “Ok.”
Step 3. Add them using AWeber when you get home.
When you gather names and email addresses at networking events, add them via AWeber’s interface when you get home.
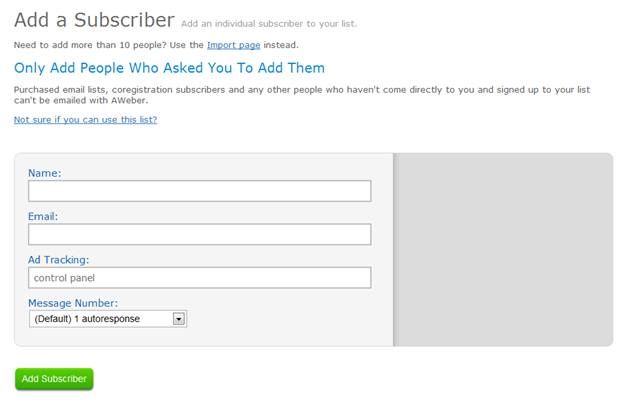
Log into AWeber and go to: Subscribers > Add
Enter the name and email and click “Add Subscriber”.
It’s easy, and here’s a screenshot:

Once you click “Add Subscriber”, an automatic email is sent to the prospect asking them to confirm their email address. This is called an “opt-in” message. It gives them the chance to first confirm that they want to get an email from you.
Once they click confirm, they will automatically get your welcome message as well as future email messages you send out.
And you’re on your way.
Now on a regular basis, you send out articles, tips, or other resources to your list to nurture them.
In AWeber, this is called sending a “broadcast.”
I recommend sending text-only broadcast messages to start with as they are faster to create, have fewer technical issues, and are highly accessible.
Subscribers will see you as an expert and get to know, like, and trust you more over time.
Tip 1 – Follow up RIGHT AWAY with hot leads.
If someone you met is ideal for becoming a client, I suggest you follow up with them directly by phone or email and invite them to have a chat about their needs so that you can enroll them in coaching.
Do NOT wait for them to contact you. Be proactive with prospects who are showing a strong interest in your help.
Tip 2 – Include an offer to explore working with you in every broadcast email.
You should let people know that you are looking to get clients.
Thus, in the broadcast emails that you send to your list, be sure to include an invitation to explore working with you at the end of the email.
Here’s what one can sound like,
“Struggling to make new changes for the better? Want to find more meaning and happiness in life? (or business, or career, etc.) Then let’s have a 30-minute Reshape Your Life Consultation to help you uncover ways to make the changes you want. Email me back with your name, phone number, and a description of what you’d love your life to be like 6 months from now. ”
Tip 3 – As you amass articles, create a juicy giveaway.
In time, as you write more articles, create an absosmurfly scrumptious giveaway for those who say yes to your list.
I recommend a report or workbook that you can easily create and turn into a PDF for fast delivery.
This can be the last eight weeks worth of articles you’ve written if you can tie them into a theme, like “How to Crystallize Your Desires and Increase Chances for Success Five Fold,” even better.
Then, when you’re out networking, your invitation to your email list will be enhanced and could sound like this …
“Hey John, it’s been great talking to you. I’ve got a free workbook called, How to Crystallize Your Desires and Increase Chances of Success Five-Fold. You’ll also get tips each week to further help you make things happen faster in your life. You can easily opt out of my list if you find the information unhelpful. If you give me your email address and I’ll add you.”
Tip 4 – Go GOOF Up
Don’t sweat it if you goof up, as you get used to doing this. It’s to be expected.
I’ve sent emails unintentionally. I’ve made spelling/grammar mistakes. They actually give you a chance to apologize and show people that you’re human.
The bigger mistake is trying to be perfect or worrying about making an error and then taking no action at all.
In summary
In summary, if you’re out meeting and telling people about what you do, take advantage of those positive interactions and start getting people onto your email list with a nice invitation. Start building these two assets: (1) your list of possible clients (use AWeber) and (2) your list of valuable articles – and you do not need a website to start doing this!

Someone asked me, “I did not think aWeber allowed you to manually add names to your list? is that correct.”
My answer:
Yes and No.
NO, you can’t ADD them completely, but YES you can “invite them” manually by using AWeber.
When you do invite the potential subscriber, he/she needs to “OK” it by clicking a confirmation link (automatically sent when you use AWeber’s interface.)
Kenn